Monday, October 31, 2011

Grandma Sally's Marinated Garlic Stuffed Mushrooms - 52 Appetizers Recipes

Pin It Now!
Props for this tasty little appetizer goes to a wonderful blogger, COOKING FOR MY PEACE OF MIND. She advertisers her cooking style as "stress cooking" to deal with distractions outside her "everything is fine" kitchen! I love her site, and it is always worth a look...

Click the photo of her web header to see her blog...

Back on November 3rd, 2008 Danielle made the following post... Grandma Sally's Marinated Mushrooms. As long tome readers know, I love to entertain, and I filed this one away for my next big get together. In my opinion, it is a perfect appetizer...

Here's her recipe...

1 1/2 lbs. mushrooms (I used crimini)
3/4 cup oil
1/3 cup white wine vinegar
1 1/2 tsp. salt
3/4 tsp sugar
1/2 tsp basil
6 - 10 pepper corns
1 bay leaf
1 garlic clove

Gently wash your mushrooms and cut the dry ends off the...stub? stem? trunk? Whatever it is...cut it off!

In a good sized deep skillet or large sauce pan, combine everything except for the mushrooms. Simmer for about 10 mins

Add your mushrooms and stir until nicely coated. You'll know when they're all coated cuz they get all shiny and pretty.

Cover and cook. Now...depending on the size of your mushrooms, you'll want to cook them for about 5 - 10 minutes. The original recipe said 3 - 5 minutes but my mushrooms were pretty good sized and I ended up cooking them for 10 minutes. You don't want them soggy...wilted or soft. You want them....mmm...I dunno....kinda al dente.

Once they've cooked and cooled off, put them in a storage container and keep in the fridge until you're ready to eat.

WELL, this sounds easy enough... Pretty quick, and can be made ahead of time (Very important when you have a houseful of people coming over)... I made a few small changes,

HERE's WHAT I DID...

First, I substituted Oils and Vinegars for some flavored oils and vinegars. I had some O OLIVE OIL brand Jalapeno/Lime Oil, and some Zinfandel Vinegar. Next, I altered her spices. Earlier in the year, I made a batch of Steven Reichlen's recipe for MEDITERRANEAN RUB. The rub is equal parts tarragon, oregano, dill, thyme, rosemary and salt. I like to keep my rubs for no more than 3 months. After that time, the spices start to lose their potency. So, it's now or never to use this rub. Honestly, I have used this on pork, beef and fish. On ALL of these meats, it ... well, for lack of a more polite word, it sucked as a rub for meat. But, as a flavoring in oil, all these spices should blend well... Let's see...

Oh, and I love garlic... 1 garlic clove??? I don't think so... add a bunch!

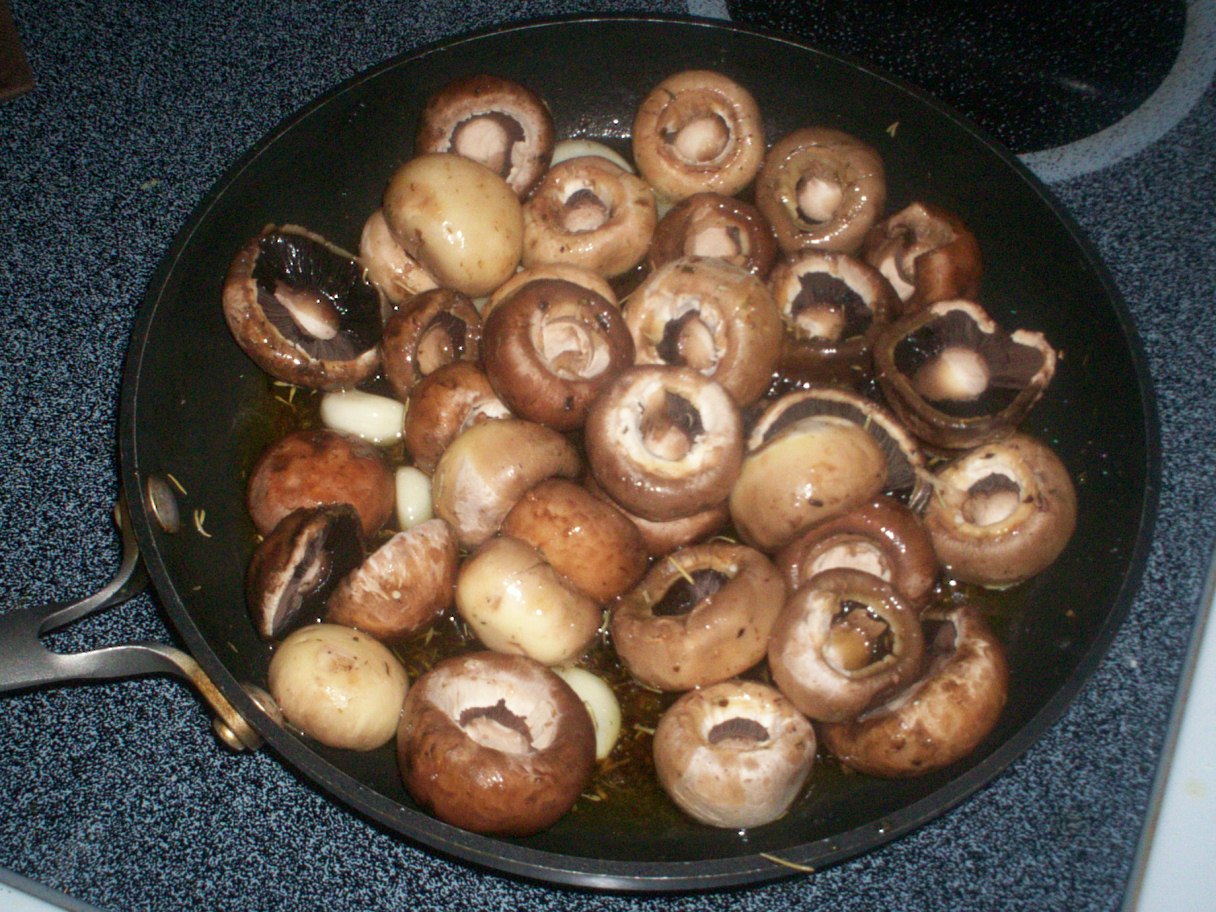
And from there, I just followed the recipe...

AND THEY WERE INCREDIBLE! Not a little bit, but a LOT. I even ate the sauteed garlic cloves...INCREDIBLE! They are a wonderful little finger food (I served with long wooden skewers). They were very popular.

Hey, would this little girl lie to you... Very Popular!

Sunday, October 30, 2011

Heaven and Hell Shrimp and Sweet Potato Chipotle Grits Inspired by The Saucy Gourmet

Pin It Now!

This was a very big weekend for me.  I got to host my final smoke of the year, one of my very favorite days!  By smoke, I am not talking Marlboros, but ribs, beans and pulled pork!

Nothing better!

But first, I had invited a foodie buddy and my wife's cousin and his wife and visiting daughter.  We were pretty excited to see the Cardinals in the 7th game of the World Series, so they made the 3 hour drive over to visit, talk a little food, do a little prep work and watch the game...

And eat!

I was looking through the recipes submitted in the last few days to eRecipeCards.com and was drawn to the classic southern treat... Saucy Spicy Shrimp and Cheesy Grits Submitted by The Saucy Gourmet!  Now I love shrimp and grits, and Shari has published a wonderful recipe, filled with cheese, thick with heavy cream and butter... wonderful seasoning and just plain perfect!

Shari is in her third year of blogging, but has her most active month this month!  I love to see her excitement with each post.  She has been known to get fancy occasionally replacing a standard Red Velvet cake and transforming it to a beautiful Red Velvet Towers. Or turn a classic Margarita into a Meyer Lemon Margarita!

So, armed with her inspiring posts to push the limits, I decided to dig out a recipe from my past, Bobby Flay's Shrimp and Grits, Roasted Chipotle Sweet Potato grits actually with a Heaven and Hell sweet Scallion dipping sauce paired with a spicy red chili sauce ala the Mesa Grill Cookbook!


Here's what I did...

The recipe can be found in Bobby Flay's MESA GRILL COOKBOOK.  According to his introduction for the dish, "I can see this as a Sunday dinner with the family, with the grits piled in the middle of the plate, surrounded by the shrimp.  But the grits are so good, you could also serve them as a side dish for an elaborate meal." ...

Or a side dish for Thanksgiving dinner???

Here's what I did...

1 large Sweet Potato
2 TBS Canola Oil
1/2 Shallot, finely diced
4 cloves Garlic, smashed and minced
2 1/2 cups Chicken Stock
1 cup whole Milk
2 tsp pureed Chipotle Chile in Adobe Sauce
   (yes, from the can, into the mini chopper to puree)

pinch Kosher Salt
1 1/2 cups quick cooking Grits
2 TBS Butter
3 TBS Honey
6 TBS Olive Oil
1 pound large Shrimp, shelled and deveined
Fresh ground Black Pepper to taste

  • Preheat oven to 400 degrees
  • Roast the sweet potato in the oven until tender when pierced with a knife (about 45 to 60 minutes)
  • Peel the sweet potato and puree the flesh in a food processor (or mini chopper)
  • Heat the canola oil in a medium saucepan, add the shallot and cook until soft, 3 to 4 minutes.  Add the garlic and cook for 30 seconds more.
  • Add the stock, milk, chipotle puree and salt... bring to a boil.
  • Slowly whisk in the grits.  Reduce the heat to medium low and simmer for 10 minutes.
  • Stir in the sweet potato puree, stirring frequently for 5 to 10 minutes, until smooth and thickened.
  • Remove from the heat and whisk in the butter  and honey to taste.  Cover and keep warm.
  • Sauté the shrimp in preheated olive oil for just a few minutes.  DO NOT OVERCOOK.  Season with salt and pepper.
Spoon the grits on a plate, top with the simple sautéed shrimp and serve with a sauce of your choice.  In the MEAS GRILL Cookbook, Bobby gives recipes for a Green Onion-Cilantro sauce and a Red Chili Oil sauce.  If you make them both, you get a little "Heaven and Hell" sauce choices, and they look great on a plate...


Green Onion Cilantro Sauce...

1 cup sliced Green Onions (white and green parts)
1/4 cup coarsely chopped fresh Cilantro
1/4 cup Rice Wine Vinegar
1 TBS Dijon Mustard
Pinch Salt and Pepper
1/2 cup Canola Oil

Combine everything except the oil in a food processor and pulse until smooth.  With the motor running, add the oil slowly until emulsified.

--------------------------------------------
Red Chili Oil...

2 red Jalapeño Pepper, roasted, with the skin, seeds and white parts removed
1 cup Canola Oil

Back to the mini chopper and blend away!

The Chipotle in the grits adds a lot!  But combining with the dipping sauces (either sweet or spicy hot), you get a taste easily adapted to please the fire eaters or the more timid taste buds of any guest.

Thank you so much for the post Shari.  Reminded me of a great classic and I hope you are happy with what I did with your idea!


So, if you want to get inspired yourself, , take a jump over to "The Saucy Gourmet",take a look through her blog and tell her "Hi" from me.

And for a quick look at what she blogs, click on the logo link image to the right.  You will see all the eRecipeCards that Shari has submitted to eRecipeCards.com.  You can add her recipes to your eRecipeBox (once you have a free to set up account).

See how useful the site is and how easy it is to find new favorite bloggers!

These posts continue to highlight bloggers and recipes that I have found on  "eRecipeCards.com"...

Friday, October 7, 2011

Candy Corn Snack Mix ala Jane Deere

Pin It Now!

Happy Halloween!  You can almost smell the sugar in the air!

And this recipe could not be simpler...

1 part Candy Corn

1 part Peanuts (OK, I had a jar of Cashews, so I used Cashews)

Mix

And viola...

A cute, almost adult Halloween snack.  Tastes like a Payday Candy Bar!  It really does!  Store in airtight container so the candy corn does not get hard and nasty tasting.


 And this is also a recipe I found just yesterday on eRecipeCards.com and was a terrific snack I had available for neighbors who were dropping in for a visit.  Storing this in a mason jar is perfect to keep fresh since...

As Stephen says, "Sometimes they come back".... BWahahahahaha

Click Jennifer's photo to see her
original post of this recipe
But I also made this snack as an opportunity to wish nothing but good thoughts for a blogging buddy, Jennifer of the Jane Deere Blog.  The day Jennifer originally posted her version of this recipe, that's her photo from her post (Click HERE)... Anyway, the day Jennifer made this post, she was making the big move from one home to a new house her family was buying in Houston.  No more exciting time, and nothing sadder to be starting fresh and leaving those friends and neighbors behind.

Between closing on the sale of her old place and the family closing on the buying of the new home, Jennifer, husband and three children will be living in close quarters in an RV (God help her).  Has to be a tough time for her.  So, nothing but good thoughts.

Click the logo to join in the Linky Fun every Friday
Even in the midst of all this upheaval in her life, Jennifer still takes the time to host her linky party, Fusion Friday.

If you have never been involved in a Linky event, they are very easy.  Just pick out a favorite recipe or DIY craft project and follow the simple directions to be a part.  Linky parties are a great way to be seen and to see other's talents.  Jennifer's is among the best!

So, take a minute, stop by her blog and say hi!

I am pretty sure she would appreciate the good thoughts!


And while you are saying hi, take a jump over to "Jane Deere",take a look through her blog and tell her "Hi" from me.

And for a quick look at what she blogs, click on the logo link image to the right.  You will see all the eRecipeCards that Dee has submitted to eRecipeCards.com.  You can add her recipes to your eRecipeBox (once you have a free to set up account).

See how useful the site is and how easy it is to find new favorite bloggers!

These posts continue to highlight bloggers and recipes that I have found on  "eRecipeCards.com"...

Tuesday, October 4, 2011

7-Up Can Lemon Roasted Chicken - 52 Chicken Recipes

Pin It Now!


It's the stuff legends are made of...

Known by many as Beer Can Chicken, known by many more as Beer Butt Chicken.  But as they say, a Rose by any other name...

There are two reasons to cook a chicken with a can of liquid in it's cavity.  First, the steam from the liquid makes for the most moist, most tender chicken you can imagine.  Lately several grilling specialty blogs have done side by side taste tests using different liquids.  From water to Guinness Stout and about anything in between, the consensus appears to be that the liquid does not matter.  Blind taste tests, it's all pretty much the same.

It's just fun (in a 7th grade way) to say Beer Butt Chicken.  Not nearly enough fun to say 7-Up Butt Chicken, but that's what I used.

Which brings up the other reason this cooking method makes the best chicken...  Presentation!


But, I'm gonna show you how to take that presentation up a notch.  And even justify the semi-lewd look...


It's easy to get the look...

Just slice a lemon in half.  Actually for authenticity, slice at a little angle so the ends of the lemon are pointed straight and look... Perky (sorry).

Then slip the lemon between the skin and the meat of the breast....

And you get that special look.

BUT, this is more than just cosmetic.

As the chicken cooks, the lemon OOZES hot lemon juice into the breast meat.  Infusing that citrus taste deep into the meat.

And it works!

Really rich deep lemony taste.  Unlike anything you have ever tried.  As good as it gets.

And, just in case you are serving this to actual 7th graders and prefer not to have them giggle throughout dinner...

If you slice off thick slices of the lemon (no tips), this method works just as well.


But not as much fun.

Two bloggers have submitted different versions of Grilled Can Chicken...

Click the copy of Bobbi's Header to see her version of
"Beer in the Rear" Chicken
Bobbi of Bobbi's Kozy Kitchen has already been featured on this blog.  Bobby is my favorite success story, having lost 150 pounds and KEPT IT OFF!

Way back in August, I posted my take on her Beer Battered Asparagus with garlic Aioli!  While I fondly remember the asparagus, I have added her Aioli recipe to my goto recipe file.  I know I have made it at least twice since I discovered the recipe; so fast to make, so easy and especially so tasty!

Bobbi's take on her "Beer in the Rear" Chicken is spot on.  She tells a story of her husband and her discussing the other name for the chicken in the grocery store that made me smile (I am 40 years or 2 days from being a 7th grader myself).  But, she also explains the simple method of cooking using just the can.  While I own the handy dandy wire forms to easily make my chicken, Bobbi just uses the can and the chicken legs to form a tripod.  Click HERE (or her Header Logo) to see what I am talking about.

Click Carolyn's header logo to see her version of
"Beer Can Chicken"
Carolyn of the Cookin' For my Captain Blog has also been featured here.  Way back in August again, she showed us how to make bacon wrapped Steak Pinwheels !  A Wonderful recipe and a great way to stretch the value (?) of the ever increasing price of steak.  I always feel honored to read Carolyn's blog.  As the title and photo suggests, she is married to a US Army Captain.  Never in our 235 year's as a country have we asked so much for such an extended period of time from our Armed Services.  10 years at "police action".

Well, Carolyn, her captain and her adorable red headed children have become the faces of that police action.  Never forget that there are real families, real faces attached to those stories we read all too often about the sacrifices made on our behalf.

And if you are wanting to try this for the first time, it never hurts to read over as many suggestions as you can before trying this.  Carolyn also made a lemon chicken.  But she uses a lemon shoved in the to, blocking the steam.  The hot lemon juices would then infuse from the inside out.  Click HERE (or her Header Logo) to see what I am talking about.

SO many options, but the basics for a Can Chicken are pretty much the same...

Here's what I did...

You don't need much...

1 whole chicken (I made two.  I have been waiting for a sale and found them at 69 cents a POUND!!! I have a 5 pound bird for less than $3.50 cents!!!

You also need a dry rub of spices.  Commercial rub is fine.

For mine, you need a lemon and since I was making a lemon chicken, I decided to use a can of 7-Up for my liquid.  Again, not as important what you use.  Beer is fine and more fun to say, but soda, juice can... I have even used a Tomato Juice can and it is all good!

The technique is very simple...

Remove about 1/2 of the soda.  This step may be the only real advantage to using beer... But I digress.

Cut the top off the can and add a big TBS of the rub to the remaining soda.

Take about 3 TBS of the rub and rub the bird generously.  Be sure to rub this between the skin and the meat.  Now is when you insert the lemons.

If you have a handy form (available at most hardware stores, any grilling specialty store or on-line), slip the can in the form.  Or, carefully lower the chicken over the can and use the legs to hold the bird.

I like to line the bottom with tin foil, making a little valley.  There will be lots of juices dripping.  This way it helps deflect the heat, and steams the chicken in the juices.

And cook...  I make mine on my grill (indirect heat, for about an hour and a half).  Of course you can move this inside and cook in an oven.  I would set it at 350 degrees, be sure to put it in a pie plate to collect the juices.

You can tell when the bird is done when the skin on the legs starts to pull away from the bone.  But better, use a meat thermometer and make sure it is 160 degrees.  measure at the thickest part of the bird and measure in several places.

Let it rest on the can for about 20 minutes before you try to cut the meat.  This is VERY important as it allows the juices to stay in the meat and not drip out as you cook.


Parts of the meat just pull from the bone and are great to eat as is... Like the leg/thigh quarter shown here.

Or, pull the breast meat off whole, slice and serve with potatoes au gratin and a cheesy creamed spinach!


So, if I have tweeked your interest in Carolyn and the Cookin' For My CaptainBlog, head on over and say HI for me!

And for a quick look at what she blogs, click on the logo link image to the right.  You will see all the eRecipeCards that Carolyn has submitted to eRecipeCards.com.  You can add her recipes to your eRecipeBox (once you have a free account).

See how useful the site is and how easy it is to find new favorite bloggers!


...   .............   ...

So, if I have tweeked your interest in Bobbi and her BOBBI's KOZY KITCHEN Blog , head on over and say HI for me!


And for a quick look at what she blogs, click on the logo link image to the right.  You will see all the eRecipeCards that Barbara has submitted to eRecipeCards.com.  You can add her recipes to your eRecipeBox (once you have a free account).

See how useful the site is and how easy it is to find new favorite bloggers!

These posts continue to highlight bloggers and recipes that I have found on  "eRecipeCards.com"..

Sunday, October 2, 2011

Peach Cream Cheese Coffee Cake ala One Perfect Bite

Pin It Now!

OK, first thing I need to do is describe the coffee cake...

It's been a favorite recipe of mine for awhile.  The cake part is moistened with sour cream, so the base stays soft and moist.  Just wonderful texture.  The middle layer is a cream cheese sweet sugary mix that melts into the cake as it cooks for a delicious custard like consistency.  The cake has a big advantage in addition to taste... JAM!

Yeap, you name the jam and this cake becomes the logical end product.  I have made this with Strawberry, Raspberry, Apple Cinnamon, Blackberry and I even remember making this with a jar of Apple Butter.  It's a great recipe that is perfect for jam lovers.

BUT...
I have a new favorite "
secret" ingredient

Yes, you read that correctly, Peach and Habanero PEPPERS become a tasty, spicy spread.  perfect for adding a kick as finishing sauce while grilling, a punch to your morning bagel or glaze to your vegetables.

Here's the story...

This weekend is a pretty big deal here in Kansas City.  It is the American Royal BBQ.  over 500 of the most ambitious Quers from around the world gather in my backyard (metaphorical backyard at least) for the World Series of Smoke!  I did not bring my camera this year, but you get the metaphor... smoke photo, world series of smoke... you get it right?

This year I had two good friends with parties and a few acquaintances to visit.  Unlimited Que, grilled side dishes and an adult beverage or two.  Oh what a night indeed.

But also there is a mini expo at the Royal.  A place for a few small entrepreneurial specialty food vendors.

Click the logo photo to see the Dawg's Website
One of those high minded chaser of dreams is the very fun folks from CHILI DAWG'S Foods and Fire.  Based in Nebraska, I met the husband and wife who are heart and soul as well as more of the staff (maybe co-owners, we didn't get into who does what).  And despite my best efforts, I paid cash money for the jars I brought home (Fair practices stuff says that bloggers have to say if they are getting anything free... I didn't).

Several suggestions were made to use the spreads (Their word... looks like Jam to me).  As a glaze for meat, a flavor enhancer for vegetables.  At their booth, they served crackers spread with cream cheese and topped with the spread as an appetizer.  All that sounds fine, but I had this recipe in the back of my mind.


I actually made two of these.  One with the peach and the other with my personal favorite, Mangonero.  We had neighbors with visitors for the weekend so I got up early to make one for us and one to share!  For the record, 5 adults and one teenager.  The 5 adults LOVED this.  The teenage daughter reacted like a teenage daughter.  I was hoping to actually hear, "It tasted like someone crapped in my mouth", but that was pretty much the non-verbal reaction I got from her.

So, file this as an adult cake.  Best for lovers of spice.  The habanero taste is certainly there, but in no way (despite the teenagers reaction) is it so overpowering that properly warned diners would not fined this a delightful full of flavor treat!

And for you less brave souls, or if you do not have access to this product (but they do mail order), this recipe works WONDERFUL with any jam, jelly or fruit compote.

I originally found this post from MARY at the ONE PERFECT BITE blog.  Mary is one of my favorite bloggers of all time.  In fact, Mary was the first blogger I chose to use as an inspiring blogger for the very first post I made for this site.  Here's what I had to say about her then...

"Let me say a word about Mary and her blog...  "One Perfect Bite" and Mary is an old pro in the food blogging world.  Mary has been blogging since 2008, posts every day (an amazing achievement), has over 1,000 posts and has earned enough respect to have over 2,500 followers.

Of all the blogs I see, hers is the most ready to make the jump to cookbook author or magazine published contributer.  Her posts all have a distinctive look.  She starts with either a personal story or a history of the dish.  She rarely ventures away from classic dishes (either US or international).  She explains the dish and adds her notes on why she changes an ingredient.  Often she mentions the process of making the dish a couple of times in order to get the taste or texture that she likes.  Then she clearly lays out the recipe with an ingredient list and step by step, easy to follow directions.


Mary also has quite an accomplished eye as a food stylist and photographer.  Take a look at the corn on the cob to the left.  That is her photograph.  She takes the time to add a garnish (the lime wedges), as well as a sprinkle of a red spice (my guess is paprika) to add a color contrast to the yellow corn.  Pretty plates and mixing background colors makes each dish unique and appealing.

For new bloggers as well as experienced foodies, time on her site is always a learning experience.  In my blogging life, I am guessing I have made more dishes from her recipes than any other blogger.  She always takes the time to respond to any email questions I have as well as dropping me friendly comments on my blog."


And nothing has changed my opinion of her since... Who loves ya Baby!

I made few changes.  Primarily I made two smaller cakes, changed the jam and increased the amount of Cream Cheese/sugar filling.  So, with great thanks, here's my adapted recipe...

This is the recipe for one large cake made in a springform pan.  I used two smaller oblong cake pans

PeachBanero Cream Cheese Coffee Cake...Adapted from the kitchen of One Perfect Bite courtesy of Allrecipes

Ingredients:

2-1/4 cups all-purpose flour 
3/4 cup sugar
 
3/4 cup cold butter
 
1/2 teaspoon baking powder
 
1/2 teaspoon baking soda
 
1/2 teaspoon salt
 
1 cup sour cream
 
1 egg, beaten 

1-1/2 teaspoons almond extract
 

FILLING:
 
1 1/2 (12-oz.) package cream cheese, softened
 
1 cup sugar
 
1 egg
 
1/2 cup PEACHBONERO Habanero Pepper Spread
 
1/2 cup slivered almonds
 
Confectioners' sugar (optional)
 

Directions:
 

  •  In a large mixing bowl, combine flour and sugar. Cut in butter until mixture is crumbly. Remove 1 cup and set aside. To remaining crumbs, add baking powder, baking soda and salt. Add sour cream, egg and almond extract; mix well. Spread in the bottom and 2 in. up the sides of a greased 9-in. springform pan.
  • To make filling, beat cream cheese, sugar and egg in a small bowl until blended. Pour over batter; spoon raspberry jam on top. Sprinkle with almonds and reserved crumbs.
  • Bake at 350 degrees F for 55-60 minutes.
  • Let stand for 15 minutes. Carefully run a knife around edge of pan to loosen; remove sides from pan. Dust top with confectioners' sugar if desired. Yield: 8 servings.

OK, for details of Mary's original recipe, I am going to ask you to go to Mary's original post for her... RASPBERRY CREAM CHEESE COFFEE CAKE RECIPE (click HERE).


Click the logo to see their website!
And a huge best of luck in a very competitive world to the very nice folks at Chili Dawg's.  Please take a minute and drop by their website... drop em a comment and tell them Hi for me!


Hope you all had a good time in KC!

FMP